Outcome:


Intro:
Look at that workflow above – have you ever seen something so beautifully simple? I’m excited to share several solutions with you in this one post. This post should cover the following:
- Working with content types
- Creating a template for each content type capable of having merge fields
- Finding a way to merge list item info into a new document via workflow
- And if you’re super ambitious, expanding the workflow just a bit with an if/then statement to use different templates based on conditions in your list
But because this is a massive topic and could be tailored an infinite number of ways, I encourage you to comment or tweet me for additional guidance more specific to your scenario. So here we go!
Let’s Do It:
Create library and list
A. “Add an App” to your site to create a new library and then again for a new list if you don’t already have one of each you’re hoping to use for this project

B. Keep in mind a couple of things:
- If you want your automatically created document to have a date as part of the title, add a calculated column to your list and call it something like “JustDate.” This is important because when we get to workflow, you’ll have the option to use fields of your list item in the name of the file and the default formats won’t work and will cause your workflow to fail. The formula of the calculated column should not use parentheses and could be =TEXT([NameOfDateField],”YYYY-MM-DD”)

- Your document library will need columns added that match fields in your list if you want to use merge fields in your document template. In my examples, “Meeting Date” and “Meeting Time” are two fields you’ll find in both my library and my list because I want those to transfer from my list to my workflow-created document. (Go to settings –> library settings –> create column)
Create content type
If you don’t have content types, your newly created documents would just be blank documents unless you alter the default document template (not recommended unless you never want to create a document within your site from scratch). We’ll create a content type here that is a meeting agenda.
C. Go into your site settings and under “Web Designer Galleries” click “Site content types.”
D. Click “create” at the top of the page.

E. Follow the image to fill in every field correctly. For the first two drop-downs, we’re basically just saying our new content type is a document, and for the last I’m just creating a new group in which I will keep (and add) all new custom document content types I create. I begin the name with an underscore so that it will appear at the top of my lists for easy access.

F. Click “OK”
G. Go to back to your document library, then settings –> library settings –> advanced settings and change “allow management of content types” to “yes.”

H. Go back to your document library’s main settings and you should now see a “Content Types” section with “Documents” as your only content type unless you’ve added others previously. Select “add from existing site content types.”

I. You should now see, in the dropdown menu, an option for the group we created in step “E.” Select that and then select your new content type. In our example, this is “Agenda.” Click “Add” and “OK.”

J. You’ll be redirected to your library settings page again where you’ll see your new content type listed. Click on the name of it to be taken to the list content type settings page. We’ll come here again later to set our template for this content type so make a mental note of how you got here.
K. “Add from existing site or list columns” – most importantly, those that you want to use in a mail-merge sort of way where your document automatically pulls in list item data to populate fields in your template. Be sure to require those that your finished product would be useless without.
Create template
L. By default, your new list content type is visible when you go to your document library to create a new document, as seen below. Let’s leave that as-is for now. Later, if you decide you would only want this document type created by workflow and not manually by any user, you can come to the library settings page, and select “change new button order” under content types.
While our content type is visible, go to your document library, click “New” then select your new content type, in our case “Agenda.”

M. When that opens, select “Edit in Word”. This will bring along our required fields so we can place the merge fields in the template.

N. Create the template for your document (or copy and paste from an existing template to this new document so that you’ll be able to use your merge/content type fields). Use whatever formatting you like as you normally would. When you’re ready to put in your merge fields, go to the insert tab, then quick parts, then document property. You should see your content type fields there.
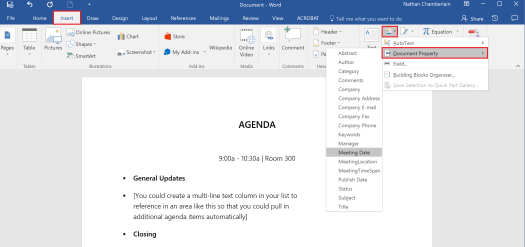
O. In the example above, I’ve already inserted “MeetingLocation” and “MeetingTimeSpan” and formatted them how I like. The last merge field I’m including is “Meeting Date” and when I select it, it’s added to my document. When we actually do our workflow, these fields will update to the values of the list item on which you’re running the workflow. As long as those values/columns are required in your list and content type, you’ll make sure you don’t run into issues with incomplete or erroneous outcomes.

P. Save your new document. You can rename it later within your document library. Close Microsoft Word.
Q. Open your document library in SharePoint and find your new document, in my example it’s document.docx. Rename it to something obvious like NewAgendaTemplate.docx.
R. Go back to site settings –> site content types (under Web Designer Galleries) and select the name of your new content type. In my example, it’s Agenda. Then select advanced settings.
S. Type the path to your new document template in the first field, “Enter the URL of an existing document template.” In my example it would be something like “/[SITE]/[SUBSITE]/Shared Documents/NewAgendaTemplate.docx.” Your document library may be named something else if you’re not using the default library so double check the path.

T. Click “OK.” The hard part is over!
Create workflow
This is quite a simple workflow, really, so we’re smooth sailing from here.
U. Open SharePoint Designer and create a new list workflow on the list you created for this (or the list you’re using for it, anyway). Your description will show up on SharePoint under the name of the workflow to let people know what it does, so label accordingly. Also, it’s most important that you create a 2010 workflow – 2013 does not work for this purpose.


V. This is basically a one step workflow, but I always add “set workflow status to…” the beginning and end of a workflow so I can easily see if it’s started or finished. So once you “set workflow status to started/initiated/etc.” add the action create list item. Select “this list” and choose your document library. Your required fields will be in the list.

W. Select each field one at a time, then “modify.” Set Content Type ID to your newly created content type. In my example, it’s Agenda. Set Path and Name to either a list column value (using function) or use string builder to make it a little more custom. In my example, I’ve used a calculated column in my list, JustDate, to append the date (without the time or parentheses, as the normal date fields would do) to the word “Agenda-“.

X. Finally, set your remaining required fields to values from your list so they’ll pull into your template how you want them to. Click “OK.”
Y. Add your final workflow status step (set workflow status to completed), publish and voila! Try running it on a list item. Go to your list, click the ellipses next to a list item, then advanced, then workflows OR select your list item then go to “items” in the ribbon, then “workflow.” Select the name of your workflow at the top, click start and wait for the magic to happen.
Z. Don’t forget to go back and change your new template to not “visible” on the “new button” in your document library if you don’t want people to be able to use the template outside of your workflow. Also, I would recommend having this workflow run manually only, but it might make sense for some purposes to have this workflow run automatically when an item is created or changed. You can change this setting in SharePoint designer on your workflow’s settings page. And finally, you can go through some of these steps again to create additional content types, then add an if/then statement to your workflow to create different documents from content type templates based on a list item column.
I hope this post has been helpful! If you have any questions or run into any trouble please don’t hesitate to comment below or reach out to me via twitter. Happy SharePointing!
This is a great guide and works perfectly for me except when I update the original list item, it stripes out everything from the document. Do you know if there’s a way to update the word doc with new/changed information from the original list? do you still answer questions here?
Thanks
Can SharePoint list rich text fields be sent to a Word template using this method or do all text fields need to be plain text? Thanks.
Can you update this procedure to use MS Flow, instead of SharePoint Designer? Microsoft is going to phase out SharePoint Designer. I would love to see what the MS Flow Workflow procedure would look like.
I am experiencing the same problem, my template is not filling out, my placeholder items in my template are staying placeholders in each newly created file by the workflow. My content type is correct, I’ve even tried starting fresh with a completely new list, library, content type and workflow. Has anyone gotten this process to work, and if so, could you elaborate some details that perhaps I am missing?
In your workflow, on the create document action, are you setting the metadata/column fields to what should fill in the placeholders? Or can you see in the document library if the metadata is there? If it is populating, but just not in your document, I would make sure your template is a .docx file and would try adding the “quick parts/document properties” again and saving.
Have you In your trials faced the issue of the document properties having 255 character limit? This seems to be the problem with this solution if you have a column which is a large text.
can we add dynamic picture (may be picture of author )to the word document created ? Please reply. Though i can see the the option called developer in ribbon – xml mapping …but it is not working in my case at least.
I am trying to follow this same procedure to create an Excel Template. How can I insert/merge fields from my list into my excel file as you did on this example? I was able to create the template and workflow for the list but cannot figure out how to insert merge fields. Thank you!
Thank you for the detailed explanation. I have actually made it work. I am interested in your
#4. expanding the workflow just a bit with an if/then statement to use different templates based on conditions in your list
Would you please give pointers on that. Also I need to merge two lists to get data to be written to a word document based on a template. I am planning to write a JSOM from two lists into a third list and run the workflow from there. Is it a good approach?
Thank you so much again for providing great details and helping out!
Just curious if anyone has every been able to get this to work correctly. I’ve tried following all of the above steps creating the new Content Type, new template, adding the creation step to my workflow, etc…. Using the template and doc type on the library and MANUALLY creating a new document uses the correct template as expected. Running the workflow will actually create the Document Library item as expected, but when trying to access that document, every time I get an initial popup message in SharePoint that says “Sorry, we can’t open this presentation because we ran into a problem. To view or edit this presentation, open it in Microsoft PowerPoint.” Clicking the button to open the document in PowerPoint (which is what I’ve set my doc type and template up to be) just opens a blank PowerPoint doc that doesn’t even have a blank slide in it.
I’m completely at a loss here.
Hi – I am following the steps of the above guidance but I am getting a blank document from the workflow. Any idea what may be going wrong? All the rest is as per description (template available in drop down etc.)
Hi Rod – in your workflow when you create the new item are you modifying “Content Type ID” to the correct content type that contains your template? You might also double-check that your new content type’s advanced settings have the correct template.
I’m having the same issue, and my Content Type ID is correct…
Same issue, any resolution?
Simply EXCELLENT. Well formulated and described. Thanks.